Salt dough toys. How to make New Year's toys from salt dough? Airplane - craft made from salt dough
Instructions
Start with preparation salt dough. Pour 1 cup salt into a bowl. It is best to use finely ground salt, then the dough will be more plastic and homogeneous. Pour it with one glass of hot water and stir until completely dissolved. Once the water has cooled to room temperature, add 1 cup of flour to the bowl. Knead the dough thoroughly.
To make sculpting more interesting, make the dough colored. To do this, divide it into as many parts as there are different colors. Add food coloring or gouache dissolved in water to the dough. Knead it again and check that all parts are the same in density. And if necessary, add a little flour or water.
Roll the colored parts of the dough into balls and place them in bags to avoid chapping. When it comes into contact with air, a salt crust appears on the dough, which needs to be cut off from time to time. As soon as the dough is ready, you can immediately begin modeling.
In order to sculpt a toy in the shape of a dog, roll up a ball for the future body and stretch it into a bean shape. Decide where the dog's nose will be and where its tail will be. Make legs from the dough and attach to the body. If the dough does not stick very well, run a damp brush over the junction of the parts. Sculpt the ears and tail and attach them in place. Make holes for the eyes and nose.
Place the molded toy to dry in the sun. In a day it will be covered with a crust and will look quite strong, but this impression is deceptive - it will still remain raw inside. The craft will dry completely only after a week. If you are in a hurry, you can dry the toy in the oven. Preheat the oven to 70 degrees Celsius, place the toy on a baking sheet and leave the door open. For 0.5 centimeters of product thickness, 1 hour of drying is required.
Paint your craft with gouache. Just keep in mind that the paint should be quite thick so that the dough does not have time to get wet. Let the paint dry for two days and coat the toy with wood varnish if you want it to last a long time.
Crafts made from dough are not exactly cooking. This is already art. And besides, this is a good gift. You can make a variety of toys from the dough, and then decorate them with paints: gouache, watercolors or food coloring. The main thing is that the dough should be salty.
You will need
- Flour - 3 cups;
- Salt - 2 cups;
- Water - 1 glass;
- Paints and brushes for painting figures.
Instructions
First of all, mix the ingredients to such a consistency that the resulting mixture does not stick to the dishes. As you cook, add a little more salt or, conversely, water. It all depends on how thick the dough turns out. Don't be afraid to experiment with consistency.
From ready dough Now you can sculpt any, for example, figures of men, fairy tales, animals and whatever your heart desires. After this, the finished figures must be dried. Can be dried at room temperature, especially if the figures are small and not very voluminous. You can also dry it in the oven at a temperature of 120-140 degrees Celsius. In large figures it is necessary to make a puncture inside for better and faster drying.
Paint the figures. You can use watercolor and add PVA glue to it, and then use this mixture. This way the paint will stick much better.
Video on the topic
Sources:
- how to make a figurine
You can make a lot of crafts from salt dough with your children. Unlike plasticine, this material is suitable for children of any age. Even if the child pulls the dough into his mouth, nothing will happen.

You can make such crafts at home with your child - all the ingredients are available and inexpensive. It’s especially nice to make New Year’s toys from salt dough. You can make them as much as you want and the way you want. Even the smallest children feel that they worked hard for the holiday together with everyone else if the toys they made hang on the Christmas tree.
For the dough, take 2 cups plain wheat flour, a glass of salt, 250 g of water. Mix everything well. The degree of readiness of the dough is determined by kneading - if it crumbles, add water, if it stretches or sticks to your hands, add flour. Roll the dough into a ball - if it holds its shape well, you're done. You can add a little vegetable oil– then the finished mass will not stick to your hands.
Crafts made from salt dough for a Christmas tree
To make Christmas tree decorations from salt dough, you can use cookie cutters. Even kids, with their help, do an excellent job of cutting out figures from rolled out dough. Such figures can be dried and left as is or decorated.
Try taking a cocktail straw and using it to make many small holes in a cut-out flat figure. The result is openwork products. You can also decorate with beads and sparkles, you just need to keep in mind that the toys cannot be dried in the oven, otherwise the decorations may melt. In addition to beads, shells, cereals, buttons, nuts, coffee beans, and so on can be used to decorate products.
There are wonderful lacing toys for developing fine motor skills in a child. Try making holes around the edges of a salt dough figurine, placing them in a certain order. Dry the product. Invite your child to thread bright ribbons or thick yarn through these holes. You will have a great lacing toy.
Older children can be asked to paint the toy with permanent markers or cover it with pictures using the decoupage technique.
Most people associate this holiday with magic and fun. Decorating the New Year tree in many apartments turns into a real ritual in which all family members take part, including the smallest members of the household. To make it more interesting for kids to prepare for the holiday, you can offer them to make New Year's toys from salt dough with their own hands. Such jewelry will look original on the forest beauty and, most importantly, they will be completely unique. The best way to create toys is with the whole family. great way have fun and usefully spend your free time, introducing the younger generation to creativity.
Methods for preparing salt dough
To make your Christmas tree decorations beautiful and durable, you need to make the dough for them correctly. There are several options for preparing it. For the first method you will need:
- flour - 1 glass;
- salt - 1 glass;
- vegetable oil - 1 tablespoon;
- cold water - about 125 ml (its volume depends on the quality of flour).
The dough is kneaded from the prepared ingredients. It should turn out elastic and plastic. The resulting dough is covered with cellophane and placed in the refrigerator for at least 3 hours. After this, it can be used to make Christmas tree decorations.
There is another recipe for making salt dough. New Year's toys made from such material will be characterized by increased strength. For this you need to prepare:
- flour - 1 glass;
- salt - 2/3 cup;
- PVA glue - about 15 ml;
- cold water - 100 ml.
The dough, as in the first version, after mixing all the components should be quite elastic and retain its shape perfectly. Water should be mixed into the mass in small portions, making sure that it does not turn out to be too thin. Salted dough prepared using this method hardens quickly, so it must be used immediately after kneading.

Necessary tools and decorative elements
To make New Year's toys from salt dough with your own hands with your baby, in addition to the raw materials itself, you will need to prepare a convenient wooden board on which the entire creative process will take place. You will also need a rolling pin, a plastic knife for plasticine, shaped molds, acrylic paints and several brushes of different thicknesses. To decorate crafts, you can use everything you can find in the house (for example, beads, beads, sparkles or rain).
Toy making process
Having prepared everything you need, you and your child can start creating masterpieces from dough. The easiest way is to make flat figures using molds. These can be stars, hearts, Christmas trees, angels, outlines of various animals, etc. To make such toys, you need to roll out the dough on a board (it should be 0.6 to 1.5 cm thick), and then use prepared molds to cut out different figures from it. The more crafts you get, the better. Since the toys will be hung on the Christmas tree, you need to remember to make holes in them (for these purposes it is most convenient to use a toothpick or a match).
The finished figures are dried for one hour in an oven heated to 80 degrees, or on a hot radiator. You can let the tree decorations dry on their own by laying them out on a piece of parchment paper and leaving them on the table, but this will take a few days for them to harden.

If there are no molds in the house, there is no need to despair. funny New Year's figures can be cut from rolled out dough with a regular plasticine knife. In all other respects, the process of their manufacture is no different from the method described above.
Decorating figurines
New Year's toys made from salt dough should be painted after they are completely dry. You can cover them with one or more colors and draw funny faces and patterns on them. To ensure that beads, buttons, bows and other decorative elements adhere firmly to the products, it is best to attach them to the surface using PVA glue. When the paint and glue on the toys are dry, colored ribbons are threaded through them. Unusual and very beautiful handmade New Year's decorations are ready. You can hang them on the Christmas tree with your child.

Important nuances
There is nothing simpler than homemade New Year's toys from salt dough. The photos of Christmas tree decorations presented in this article are only a small part of what can be made from this plastic material. Modeling toys, like any other type of creativity, requires imagination. Salt dough is a universal material, and you can use it to create Christmas tree figures of any complexity. However, it is worth remembering that they should not be too thin or too thick, because in the first case the products will turn out fragile and quickly break, and in the second they will turn out to be heavy and will pull the spruce branches down.
Good afternoon, today we have finally completed a large selection of ideas for New Year's crafts made from salt dough, and all the ways to decorate them. Here you will find Christmas tree decorations made from dough, pendants, decorations for Christmas wreaths, New Year's characters made from dough (snowman, Santa Claus, deer, penguin, etc.) and other children's crafts made from dough, suitable for activities in the garden or school. I promise that today you will fall in love with this world of wonderful salt crafts and will want to make your own miracle for the New Year from salt dough with your own hands.


So let's get started. Let's start with the recipe.
SALT DOUGH RECIPE
For New Year's crafts.
- Flour (wheat or rye) – 1 cup. Rye holds its shape better salt dough.
- Salt (finely ground, such as “Extra”) – 1 cup
- 1 tablespoon of vegetable oil (so as not to stick to your hands), or 1 tbsp. hand cream
- PVA glue 2 tablespoons - optional, you can do without it.
- Water - how much the dough will take. Add gradually, kneading the dough into a tight, plastic lump.
First, mix the dry ingredients - salt, flour.
Add 1 tablespoon and rub with your hands. Add a spoonful again and grind. We continue to add and knead with our own hands. As soon as we have an elastic lump in our hands, our dough is ready.
Store the finished dough tightly wrapped in cling film and placing it on a shelf in the refrigerator.
PAINTING RULES
Method 1 - paint the dough itself. You can color the dough with food coloring or salt coloring. easter eggs. COLORS are also suitable - jars of dyes from a hardware store; they are used to tint white wall paint to the desired color. They are cheap and rich in color.
Method 2 - paint the craft. Crafts can be made from unpainted dough and then painted on top with gouache and fixed with hairspray from a can.
RULES OF STYLE.
We attach large parts of the craft to each other with a match or toothpick. We glue the chalk parts with water, that is, we wet the parts with water and apply them to each other.
As you sculpt the craft, keep a bowl of water nearby to wet your hands or the dough itself to prevent it from drying out. In the open air, the dough dries quickly and loses its elasticity.
RULES FOR DRYING CRAFTS.
Can be dried outdoors, on a radiator, in the oven (130-140 degrees).
Flat dough shapes.
(New Year's crafts and toys for the Christmas tree).
The simplest version of a dough craft is a flat silhouette covered with paint, with or without a pattern. Roll out the dough into an even layer, cut out shapes, and dry. If you like ideal shapes, then I suggest you sand the dried part with sandpaper (sandpaper), sold in a hardware store for pennies. This way you will get a perfectly smooth surface of the craft.
We cover the salt dough figurine with paint of a background color (gouache, acrylic, even construction acrylic works great). Let's dry it. Against this background we draw multi-colored patterns. Let's dry it. Seal with hairspray (or acrylic varnish).

Here's a great idea for a children's craft made from salt dough for the New Year - a Bullfinch bird made from the outline of a child's palm. Place your palm on the cardboard, trace it with a pencil, and cut it out. We place a cardboard palm on the rolled out dough, cut it with a knife... or scratch it with a knife and cut it out with scissors, carefully lifting the layer of dough above the table without stretching it.

And now I want to tell several important tricks, secrets and nuances, which will help you immediately achieve a good, bright result in your work on New Year’s dough crafts.
HOW TO RECOGNIZE clear contours of a pattern on salt dough.
First, we draw the details with a pencil on the already dried dough (we make a sketch), if the sketch is successful, then we draw it with a black felt-tip pen (so that it becomes visible).
We paint all the details of the drawing with gouache, like a contour painting, without being afraid to climb onto the black edge of the outline. Drying the paint.
And then we go over all the edges with a black bold marker. This way the outlines of the drawing will become clearer (see the photo below, where the windows and doors of the salt dough houses are drawn exactly like this)

THE SECRET of choosing colors for coloring dough crafts.
If you do not draw the boundaries of the details with a black stroke, then you must follow the RULE OF CONTRAST - that is, select paints where the colors themselves stand out against each other.
The dough star craft with a penguin in the photo below is very indicative - White paint looks bright in contrast with black, and red paint is brighter when next to black and white.
But in the right photo below (with a butterfly made of salt dough) this rule is no longer observed. And pink flowers look pale and expressionless against the orange background of the craft.
But the blue flower (on crafts even lower in the shape of a star) is already bright - because blue and orange are CONTRASTING to each other.

You can make a pattern crafts from similar colors of the palette(white, blue, blue - as on the mitten in the photo below), but then you need to achieve a difference in their saturation - the blue one should be lighter, and the blue one should be richer and darker - so that there is no color fading.
It’s better to choose contrasting rich colors (red + white + green) - as was done for the craft in the right photo below - with New Year’s feet made of salt dough. A beautiful and simple New Year's craft made from salt dough for children at school or senior group kindergarten. We cut out the leaves using molds or scissors from salt dough. All painting of the craft is done with gouache.

How to paint with an embossed pattern.
You can apply a colorful design to the salt dough, enriching the decor pressed relief (as in the photo with the New Year's dough craft below). There we first make indentations with a stamp - round berries (squeeze out with a pencil and wash) and leaves (made with a stamp cut from a piece of raw potato).
After pressing the relief design, we apply paint inside the relief, giving the entire craft beautiful retro style.


How to color the salt dough itself.
First we make regular salt dough. Dough natural color. Then, at the bottom of the glass, add food coloring powder in a couple of drops of water. And add this mixture to a small piece of dough. Knead evenly with your hands (your hands will also be colored, it’s okay, everything will wash off). We get a colored lump of dough - from it we make colored elements to decorate the dough craft (such as these buttons on the mittens below).

You can use food or salty Easter coloring. In powder or immediately liquid (then it does not need to be soaked in water). As a result, we get colored material for sculpting bright details that can be used to decorate a flat dough craft.

Depending on the amount of dye, you will get a bright, juicy color (like the carrot on the nose of the dough snowman) or a pale pastel shade (like the salt dough owl in the right photo). As you can see, it’s easy to do everything yourself. Even children will be happy to help mix the dye - they are fascinated by the process of color spreading to all parts of the dough ball.

Graphic SECTOR painting
dough crafts.
With the help of the usual drawing ruler you can make RELIEF GRAPHICS - divide the plane of the salted figurine into clear sectors (as was done for the heart-shaped crafts in the photo below) and paint each sector with its own color. A beautiful and bright DIY New Year's craft made from salt dough that looks like a factory stamp. Nicely done.

In the same way you can extrude sectors WITH SMOOTH BORDERS(not in a straight line, but in a curved one). To do this, we take a sheet of thick cardboard, place it on its edge, slightly bending it, and press this curved edge of the cardboard into the dough. We get a smooth groove line (as done on Christmas tree toys from the test in the photo below).
We make round grooves in the form of a ring using caps from medicine bottles, caps of felt-tip pens and other things.
We immediately whiten the grooves with white gouache and let them dry. And on top we apply bright layers of paint.
We fix the craft with layers of hairspray, the usual one from a cheap can (or coat it with acrylic varnish from a stationery store with a soft brush).
After varnish coating, the color becomes brighter by 2-3 tones.

The varnish coating (especially in several layers) makes the craft sparkle as if it were made of ceramics with ceramic glaze.
Pay attention to the craft of mittens made from salt dough - ideal for kindergarten. We make the mittens ourselves - and give the children the opportunity to use a ruler to divide the sectors into stripes and paint the stripes with different colors of gouache. Simple and terribly interesting for all kids in kindergarten and even big boys from school. An apple craft made from salted dough is also a godsend for kindergarten classes - make a relief with a ruler on a leaf, and work with gouache for your own pleasure and with your own hands.

Crafts from dough for the New Year
with rhinestones and sequins.
You can decorate salted dough crafts with various decorative elements from a sewing accessories store. Rhinestones, sequins, sparkles, buttons, beads, beads - all this can add New Year's sparkle to your craft.

Decoupage technique
On crafts made from salt dough.
Flat dough silhouettes can be an excellent background for printing a picture from paper napkins. The technique is called decoupage. And you don’t need anything special for it, no chemicals, no tools. Just glue and a napkin with a pattern and hairspray for finishing.
We take the already dried silhouette from salt dough. If necessary, sand it with sandpaper so that the surface becomes smooth and even (although this is not necessary).
Apply a layer of PVA glue to the surface of the dough piece. We separate the thin top paper layer from the napkin with the pattern and place it on top of the glue, carefully straightening the delicate paper, not allowing it to form wrinkles or creases.

It is not necessary to fill the entire surface of the salty craft with a napkin pattern. You can place the napkin pattern on only one side of the dough silhouette (as is done on New Year's crafts - hearts made from salt dough). Before work, it is better to sand the dried hard surface of the parts with regular sandpaper and cover it with white (gouache or acrylic) - this way we will get the ideal “canvas” for our elegant art of decoupage.

Salt Dough Tools
(knives and scissors for decorating crafts)
In the photo below we see how interesting it is to use a knife and ordinary scissors when making crafts from salt dough. The point of a knife creates a triangular depressed silhouette, and scissors can be used to cut the dough into protruding sharp pieces of the same shape.

This technique with scissors comes in handy when you need to create feathers on bird crafts made from salt dough. Current craft for the New Year of the Rooster.

Salt dough weaving
For the New Year.
Here is an example of how you can make it yourself made from salt dough KNITTED HEART. First, we sculpt long sausage ropes from the dough with our hands.
Then we bend the long sausage in half and twist it into a HARNESS-SPIRAL.
We lay 2 twisted strands next to each other - sideways to the barrel - choosing their arrangement so that the turns of each adjacent strand face in the opposite direction. That is, one harness with a diagonal turn down left, and the other harness with a diagonal turn down right. Thus, 2 strands laid side by side form the illusion of ONE BRAID.
If we place several such braids side by side (each consisting of two strands), then we get CLOTH, similar to the relief of a knitted pattern.
All that remains is to squeeze out the silhouette of a heart from this canvas (with a regular cookie cutter). And place this knitted layer on top of another regular flat dough heart.

You can make an ordinary braid (from three sausages) from salt dough, put it in a ring and decorate the craft as a Christmas wreath. Form pink petals from round cakes of dough and place them on the rose. Leave the leaves with veins pressed out with the edge of a knife.

Braided dough crafts can be decorated with silhouettes cut out with cookie cutters, such as stars. Below we see a master class on carefully painting dough crafts

After drying, we cover each element with thick gouache, choosing a painting design to suit your taste. You can add glitter elements and beaded sprinkles.

Dough crafts
With relief patterns.
(embossing method).
Here is a decorative method for crafts made from salt dough that all children really like. They are delighted with the openwork pattern that, as if by magic, appears on the salt dough.

The easiest way to make a pattern on salt dough with your own hands is to use button prints. We take large buttons without holes - using double-sided tape we stick them onto ordinary wine corks - and we get convenient stamps that you can hold in your hands. We give the children stamps and they poke them into the rolled out dough. Next, we cut out the silhouettes of Christmas trees with cookie cutters - and we get a craft in the form of a Christmas tree, with New Year's balls.

Look beautiful prints of large metal buttons with a relief convex pattern - antique.
You can use grandma's in the same way. brooches, buttons with an eagle or a horse on dad's jeans, grandfather's royal coins (hee hee), embossed caps from mom's perfume, beer caps, the bottoms of Aunt Sima's crystal glasses and other interesting round stamps.

But this pattern on the salt dough Christmas tree craft is made using thick cardboard (or a rubber mat), which is rolled into a tube to form a curl at the end of the jacket. And this curl was applied to the salted dough rolled out on the table. The result was simple and beautiful. An excellent children's craft for a competition at school or kindergarten.

The bottom and sides of the decanter and other crystal flasks are an excellent store of patterns for crafts made from salt dough for the New Year.

You can also use RELIEF TEXTILES - napkins, tablecloths, and curtains with fringe. You can buy lace with a relief pattern in the store, or look for its elements in a drawer with beautiful lingerie.
Just place the openwork on the rolled out dough. And we roll over it with the same stick-rolling pin. If you don’t have a rolling pin in your house (you’re such a housewife, what can you do) then you can replace it with a smooth glass bottle or a can of hairspray.

A very beautiful and clear relief is left by RUBBER NAPKINS (as in the photo below). The fashion for them went back to Soviet era– but for DIY New Year’s crafts, you can buy a couple of elegant polyethylene napkins.

Here are the patterned things you can make from plastic Chinese napkins.
How to do it right
paint a dough craft
WITH EMBOSSED PATTERN.
We want the painting of the embossed patterned dough craft to be bright. So that the paint does not blur the pattern, but only emphasizes and highlights it. To make the pattern darker inside and lighter on top - how to do this?

Here’s how: first, paint the entire craft one color with a brush; use the brush to get into all the recesses of the pattern. Let it dry until the paint is completely dry.
And then we take paint 1-2 shades lighter (or a different color altogether) and work not with a brush, but with a foam sponge or makeup sponge.
We smear this second paint on a plate, blot it with a sponge and carefully make an imprint of the sponge on the surface of our pattern - SO that the sponge does not press into the grooves of the pattern, but is applied only on top. We repeat the procedure with a sponge until we get uniform coloring of the entire craft.
Thus, we will color the pattern with a textured highlight of it into 2 color tones - on top and inside the relief.
And here (in the photo below) is another original-colored and original-pressed craft made from salt dough. As far as I understand, this relief on the star craft was made with the help bags a la snake or crocodile skin. The surface of the bag was applied to the dough. All this was drying. And then they painted with a brush and sponge in several shading passes. Please note that not all places were painted with a blue brush; somewhere there was a brush with white paint. And then everything was powdered on top with soft white paint using a foam sponge.

You can also not look for any stamps for patterns - but make the pattern yourself - with ordinary sticks, pencils, cocktail straws. Just first, with the point of a pencil, outline the lines of the future pattern - draw faint stripes of future flower petals. And then make pinhole punctures along the marked lines. If we take sticks of different thicknesses, we will get different points, this will give the composition additional artistic variability.

And nature itself can give us its stamps to imprint the New Year's mood on dough crafts. Branches of evergreen fir, imprints of cones and dry, stringy leaves. Even at home flower pot you can find a source for a beautiful floral design.

Puff pastry crafts
with your own hands for the New Year.
Look at the layered beauty you can make with your own hands. How beautiful DOUBLE-LAYER CRAFTS made from salt dough look. The bottom base layer is made without a pattern, in a single color. We dry this layer thoroughly, then sand its surface with sandpaper (or pumice for heels, this is also good). We cover the sanded base layer with paint, trying to achieve uniform coloring (you can use a foam sponge rather than a brush or spray paint from a spray can).
The top patterned layer of the craft is made from salted dough with a relief imprint. By the way, you can make very beautiful prints using antique tin trays with relief engraving on metal. Your grandmother or elderly neighbor may have just such a tray. Your neighbor will let you use it for a chocolate bar if you clearly explain to the alarmed old lady that in 5 minutes you will return the valuable rarity to the owner. If she doesn’t trust you, invite her to your kitchen-workshop, let her see how her tray helps create a New Year’s miracle.

And here is a children's craft for the New Year - in the form of bird pendants for the Christmas tree. Here the relief is applied to the upper layers - wings and breast. First cut out the body of the bird from the dough. Then the breast and wings.
First we make a relief imprint USING WIRE. Yes, ordinary wire on a flat table is twisted in different winding directions, forming a flat pattern of twisted paths.
Then this wire is placed on the rolled out salt dough and pressed into its pulp with a rolling pin.

Two-layer children's crafts made from salt dough for the New Year must definitely contain a New Year's theme in their decor. These are snowflakes (cut out of dough), these are red berries and holly leaves. You can also make ribbons from dough or take real satin ones.

You can and should decorate multilayer crafts with beads. Beads can be placed on glue, or you can also string a bead onto a wire, twist the ends of the wire together, pierce the dough piece and spread the ends apart (spread apart). This type of wire fastening of beads is used in the craft in the photo below.
Here we see an example of a craft made from salt dough IN SEVERAL LAYERS. You will learn exactly how to make this New Year's flower from salt dough with your own hands if you read the article on our website. It shows the principle of creating puff flowers from paper, and exactly the same principle allows you to make the same flowers from dough. The rolled out dough is cut in the same way as paper, with scissors, and it is also convenient to place it in puff tiered flowers for the New Year.
The flower petal layers can be glued together after drying - using hot thermal glue from a gun. Or for batter. Check in advance how this or that method works.

But (in the photo below) we see a two-layer craft made from salt dough, to which volume has been added. Very interesting work. And in fact, making such a decoration for the Christmas tree with your own hands is not difficult.
Look, first we roll out the dough, then use a glass to cut out 2 rounds from it. In it
We find 2 Christmas balls of a suitable size. And we place our round pieces on the rounded belly of the Christmas ball. And we dry our workpiece like this right on the ball - so that it dries in the shape of a hemisphere (bowl). Next, remove the two dry hemispheres from the Christmas ball and connect them together.
The most difficult thing is to make sure that the edges of the hemispheres dock with each other (for this it is necessary that each round piece, when placed on a Christmas tree ball, takes up EXACTLY HALF of this ball), and does not go beyond the equator line, so to speak.

You can make any pattern of curls of salt dough on the surface of the round ball. How this one was done in the photo below. We place plastic film (non-fiber, food grade) on the ball, and add the elements of the pattern onto it. Dry on a ball. Then carefully remove and separate the cling film with your hands.

Liquid pattern
On crafts of salt dough.
In the photo below we see snow-white crafts made from polished salted dough, with an openwork pattern applied to it. Such a delicate, almost lace bas-relief can be made using the “liquid pattern” technique. We dilute the liquid salt dough and apply it with a pastry syringe or an envelope (a bag with a cut corner) - along the lines of the intended pattern.

First, let's sand the canvas - a dry, flat piece of salt dough. Then we draw the lines of the future drawing on it with a pencil, chalk, or felt-tip pen. And we begin to slowly apply a thick pattern.
By the way, the same work can be done with gypsum diluted with water (gypsum plaster is suitable).
Try it first on a sample to see how you work best with plaster or batter. How it dries, cracks when dried, or holds its shape. Try making samples with different degrees of liquid (from very thick to thin).
So, with your own hands and your brains, you can come up with and further experiment with new and new techniques for working with salt dough. Try it. Create. Be mischievous. Play some pranks.
You can add dye to the batter (food grade, or color jars that are sold in hardware stores for diluting them in white paint). Crafts with such a liquid pattern can be made by imitating New Year's cookies, and sprinkle them with grains of coarse salt, imitating sprinkles of sugar.

Crafts made from salt dough
WITH HOLES.
You can make shaped holes on pendants for toys made from salt dough. In the form of stars, hearts, just round holes.

Or you can squeeze out a whole openwork pattern from molds of different configurations.
By the way, this is how you can make an openwork snowflake from salt dough. In the photo below we see an abbreviated master class - it immediately becomes clear how easy it really is to make such New Year’s beauty with your own hands.

You can pour THERMO-MOSAIC into the holes in the raw dough, which melts in the oven. And when baked, it will spread into a colored lake inside the hole in the craft.

Instead of a mosaic, you can pour regular COLORED COLOR CANDIES - that is, candies. They will also melt and fill the hole. It will turn out to be a beautiful DIY craft, but the children won’t lick it off with their tongues.

New Year characters
from salt dough.
You can make various New Year and winter characters from the dough. For example, a snowman or penguins.

You can mold ordinary shapes from the dough, and then use paint to make them resemble the desired character.

Details can be drawn with a thin stroke with black gouache, or a thick black marker.

Complex STEP-BY-STEP modeling will allow you to make New Year's crafts with small elements. It requires painstakingness and perseverance to complete all the work detail by detail and dry everything thoroughly before painting.

Curly FLAT silhouettes can also be designed in the form of New Year's characters. Salt dough snowman - based on the silhouette of a STAR.

The most simple shapes- are combined and a new New Year's craft made from salt dough in the form of a SAND MAN is obtained.

To make the craft effective and voluminous, you can also use dough to make a SUPPORT for it. That is, the background, for example, is in the form of a lush bow, like in the teddy bear craft from the photo below.
The rolled out salt dough is cut into strips - they form a lush bow. Place the teddy bear craft on top of the bow and dry it all together. Then we paint, using a brush to get into all the hard-to-reach places.

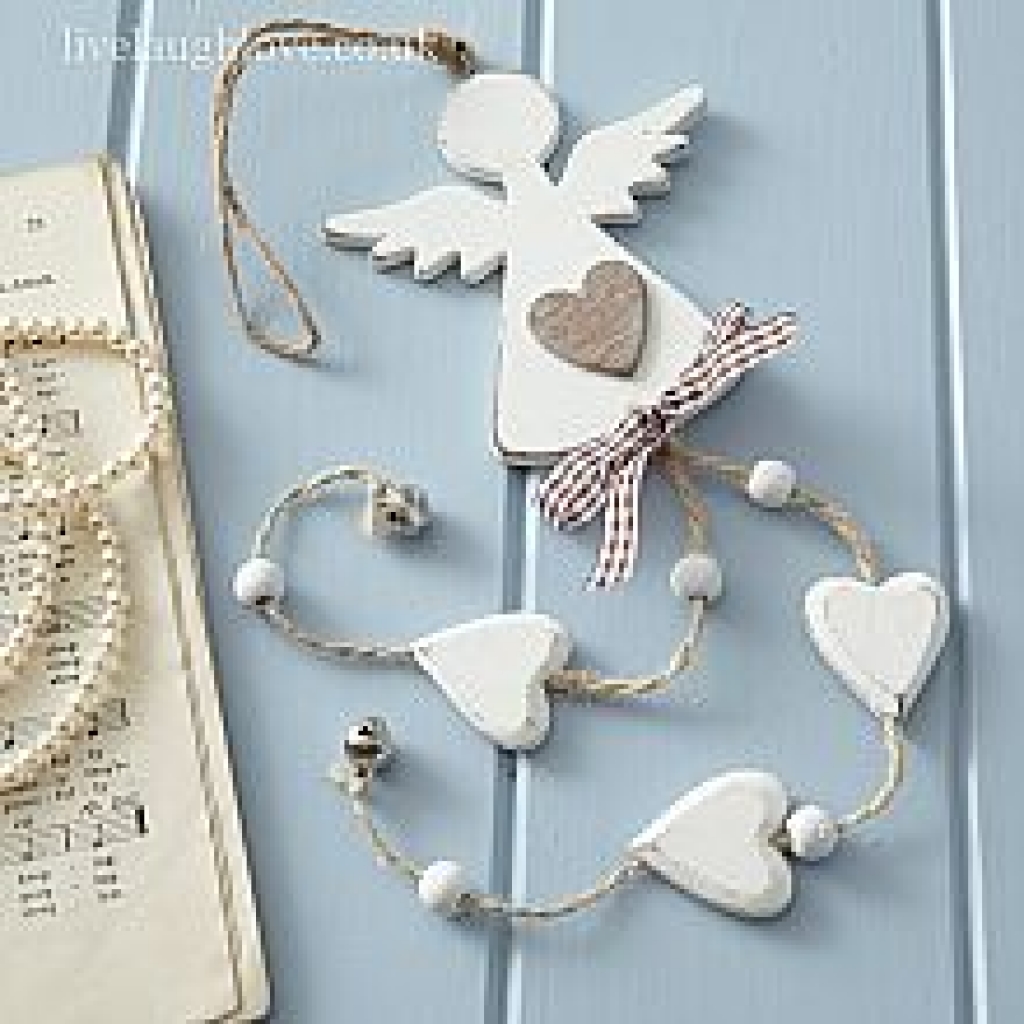
And here is an ANGEL craft made from salt dough, where our technique of relief imprinting is used - on the wings and on the tunic.

You can come up with your own design for New Year's crafts made from salt dough. In any case, your character will be recognizable after you paint everything with gouache.

Santa Claus from salt dough is also easy to make and the most in different ways(as you already saw in the photo above. The beard can be made round, branched, curly, or flat and cut along the edge with scissors (as in the photo below)


You can simply make the head of Santa Claus - with a star-shaped backing, as in the photo below.

These are the ideas for crafts made from salt dough for the New Year that you found today on our website. We have many other collections with beautiful New Year's works for children of all ages. Make your New Year's happiness with your own hands and let crafts made from salt dough give you sweet pleasure from the result of your work.
Happy New Year.
Olga Klishevskaya, especially for the site ""
If you like our site, you can support the enthusiasm of those who work for you.
Happy New Year to the author of this article, Olga Klishevskaya.
Friends, are you ready for the new year? But the holiday is just around the corner. And this is a reason to work fruitfully with your little ones. What am I offering? Today we will talk about how and what kind of New Year's crafts to make from salt dough. A prerequisite is that we will create with our kids. We involve them in as many processes as possible. In fact, the material is safe and easy to clean, so let’s allow the little ones to get their hands dirty.


Do you know what will add significance to these activities? The fact that the child will feel that all this is a very important matter! He will try hard when he finds out that his crafts will decorate the Christmas tree: as toys (we will hang some of them on the tree) or become part of the festive composition.
Let's decide. Remember? We have a main focus - New Year's themes. There is a basic material - salt dough. And in the kitchen, any housewife has the necessary tools. And our children have a good helper - us! All that remains is to get down to business.


Ingredients and tools we will need
All we need is:
- Salt;
- Flour;
- Water;
- A little vegetable oil.
Of course, I want the figures to be bright. Therefore, we use any dyes of our choice:
- Food paints;
- Eco-friendly construction;
- Markers;
- Gouache;
- Nail polish (if you need to use very little).
And in order to make dough with your own hands, and then products from the dough, you need tools. Let's prepare in advance:
- Bowl;
- Rolling pin;
- Cup;
- Scissors;
- Pen/felt-tip pen.
We will also need additional tools. We'll talk about this in the next topic, when we look at different ideas for creativity.
Various ideas for decorating works

And there’s a sea of ideas! And, moreover, boundless! But don’t forget, there are 2 points to consider:
- Abilities and capabilities of babies;
- Crafts should relate to the New Year 2018 theme. This means that if we don’t have to succeed in the symbol of the year itself, the Dog, then we should at least try to ensure that golden colors dominate in our products.
And a lot will depend on what tools we have at hand. In principle, absolutely anything can be a tool! And the decoration of the works, and even their form, will depend on what we own.
Now I intend to call something that can be used as a handy tool when making crafts, and how the work will depend on it.
Lace. They will add delicacy to the work. All you have to do is apply them to the dough and roll them over with a rolling pin.
Buttons. It will be simple and interesting for children to press buttons into finished products to create an unusual texture.
Beads. You can simply sprinkle it on your finished work, and everything will immediately shine.
Cocktail straw- This is an excellent “hole maker” that turns ordinary crafts into lace ones.
Marker. They can draw any patterns.
Hands, legs, paws. Attach your little one’s hand and make an impression of the palm; the same can be done with the leg if you have a baby. If your dog doesn’t mind, then the prints of its paws will also look symbolic.
Master class
And now I’ll share what my baby and I did. And at the same time I will conduct a small master class.
I'll start with our video. In it we show how to knead the dough, how to sculpt a big owl on a Christmas tree, how to decorate a window in the form of a Christmas tree with dough toys.
And now, as promised, a photo lesson: how to make a slightly different owl, hedgehog and snowman.
You all remember the recipe:
- Flour – 1 tbsp.;
- Salt – 1 tbsp.;
- Water.
It is better to take fine salt. It is cleaner and mixes better with flour and water. But I specifically took a large one, because I mainly intend to bake all the products. And when baked, coarse salt gives it an unusual golden color. As for water. I didn’t say how much is needed. It took me half a glass. But it is better to focus on how much the dough will take so that it is not liquid.
I will try to attach a photo to each step.
So, the ingredients:

The dough turns out tough, but very plastic. I divide it into 3 parts.

From the two I intend to make figures of a Snowman and a Hedgehog. And I’ll divide the third part in half, and the baby and I roll out the mass and twist two circles with a glass.
I'm eager to try how flathead owls are made.
And the second part is a toy for the Christmas tree.

Now I will talk about each craft separately.
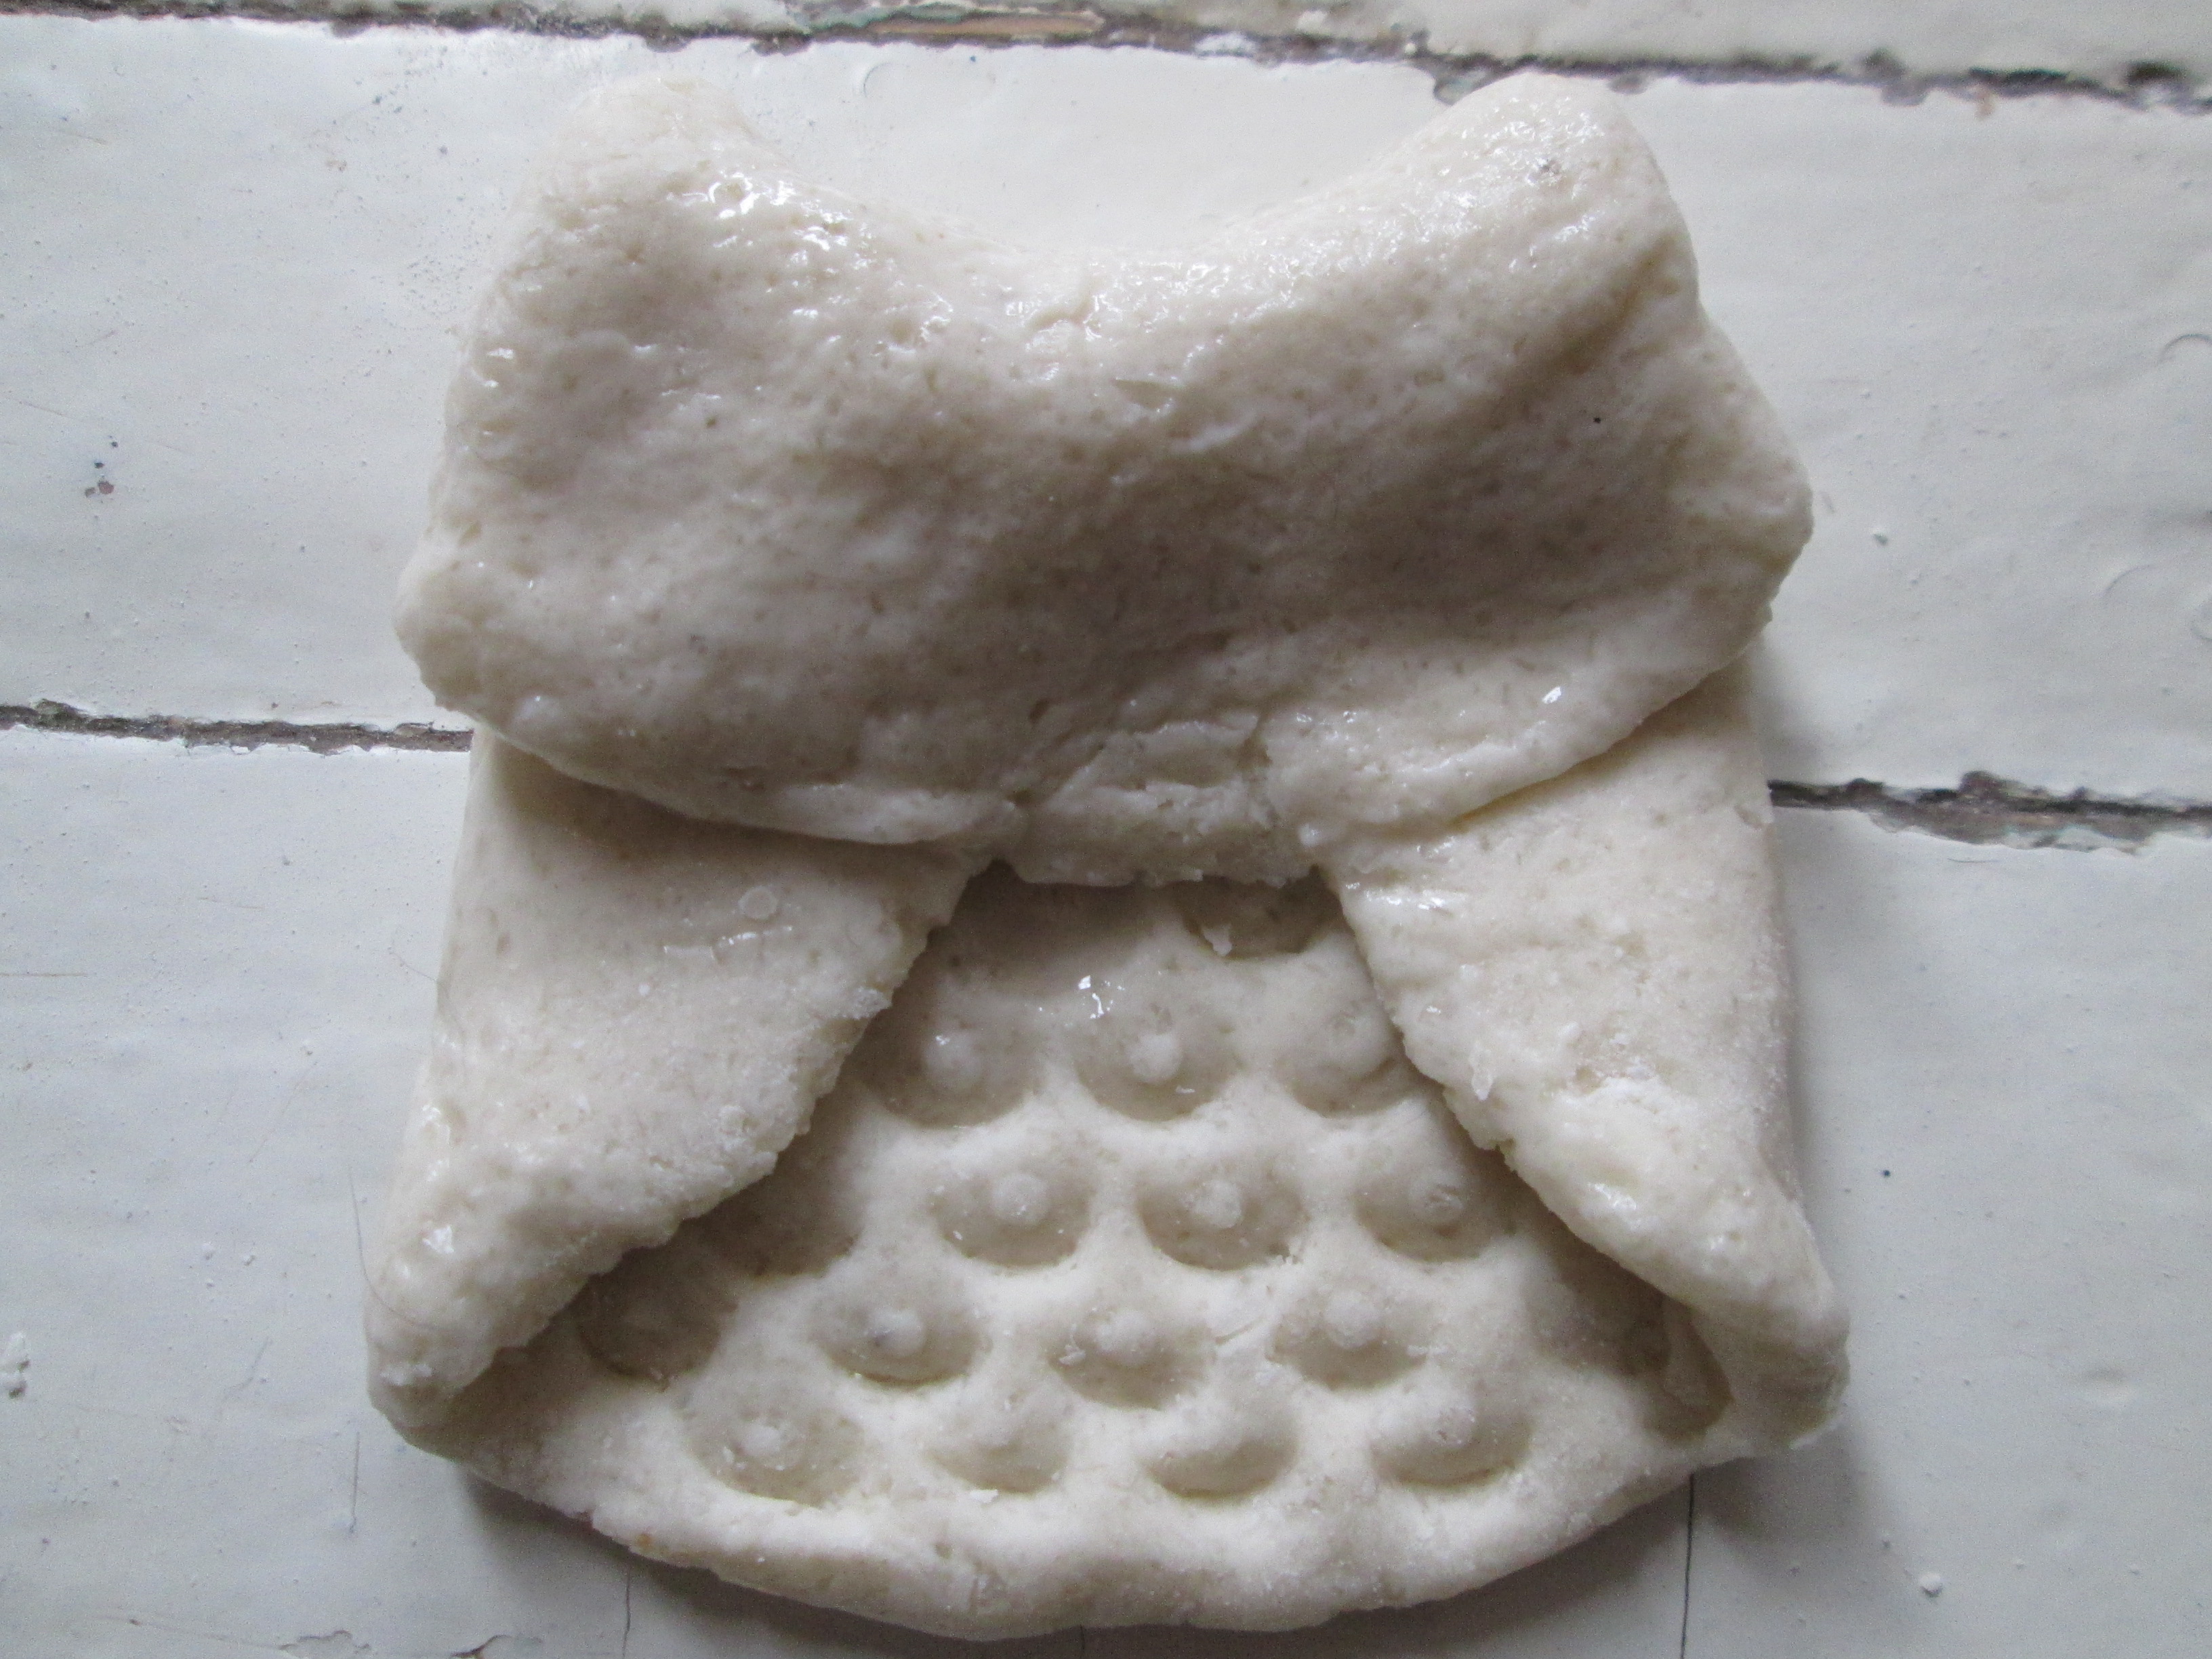
Snowman
1.Making the base for the snowman. I cut out a circle and decorate it, squeezing out the relief with the tip of a knife.

I divide the remaining mass into 3 parts so that one is large, the second is medium, and the third is small.
I roll the largest piece into a ball in my palms. I make a small depression in the middle.

I do the same with the second one. This way the entire structure will stand firmly without any special fastening.
I insert a thin twig into the middle ball. These are the hands of the Snowman. I place the shell on top walnut. It turns out to be such a hat.
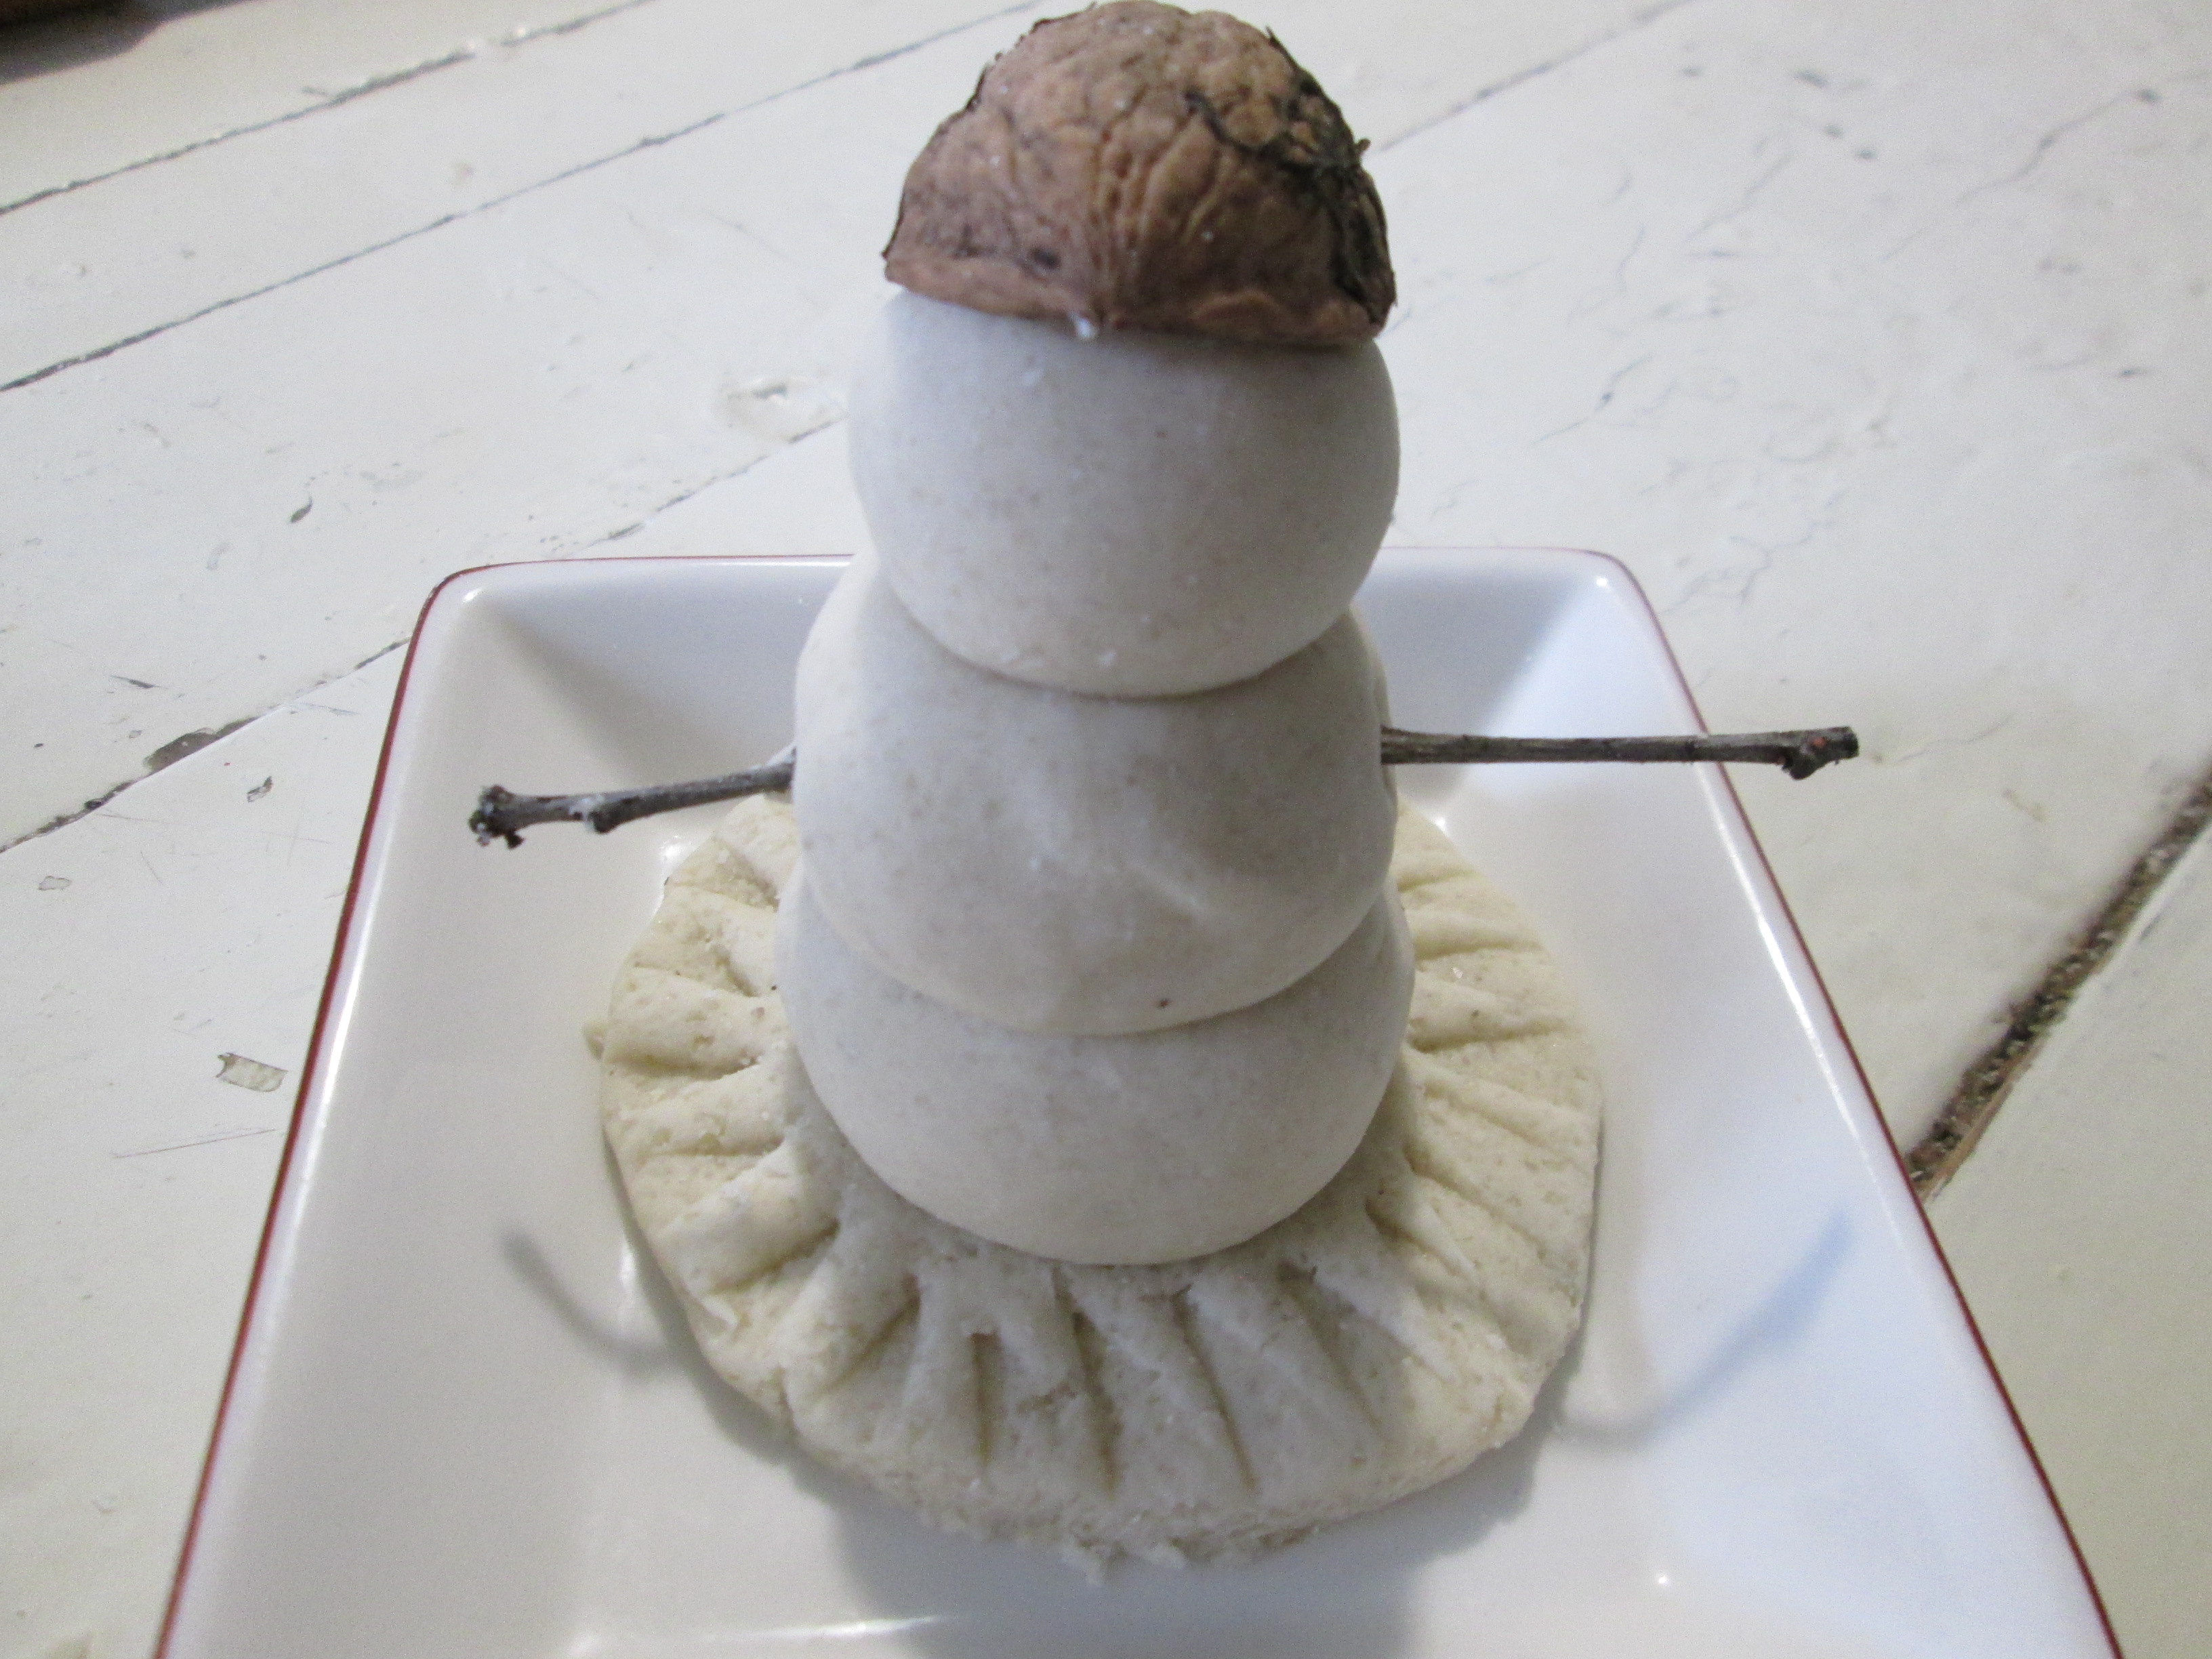
I make the nose from the tip of a toothpick.

How to paint a Snowman? I won't put it in the oven. I'll just wait for the dough to form a crust on top. I have matching colored nail gels. I use them for painting.

The details remain: mouth, eyes, snowflakes based on the Snowman.
And this is what happened to me.

Owl
I press the bottom half of the circle with a pen cap. The result is a feather pattern.

I fold the edges on the sides so that they touch each other.
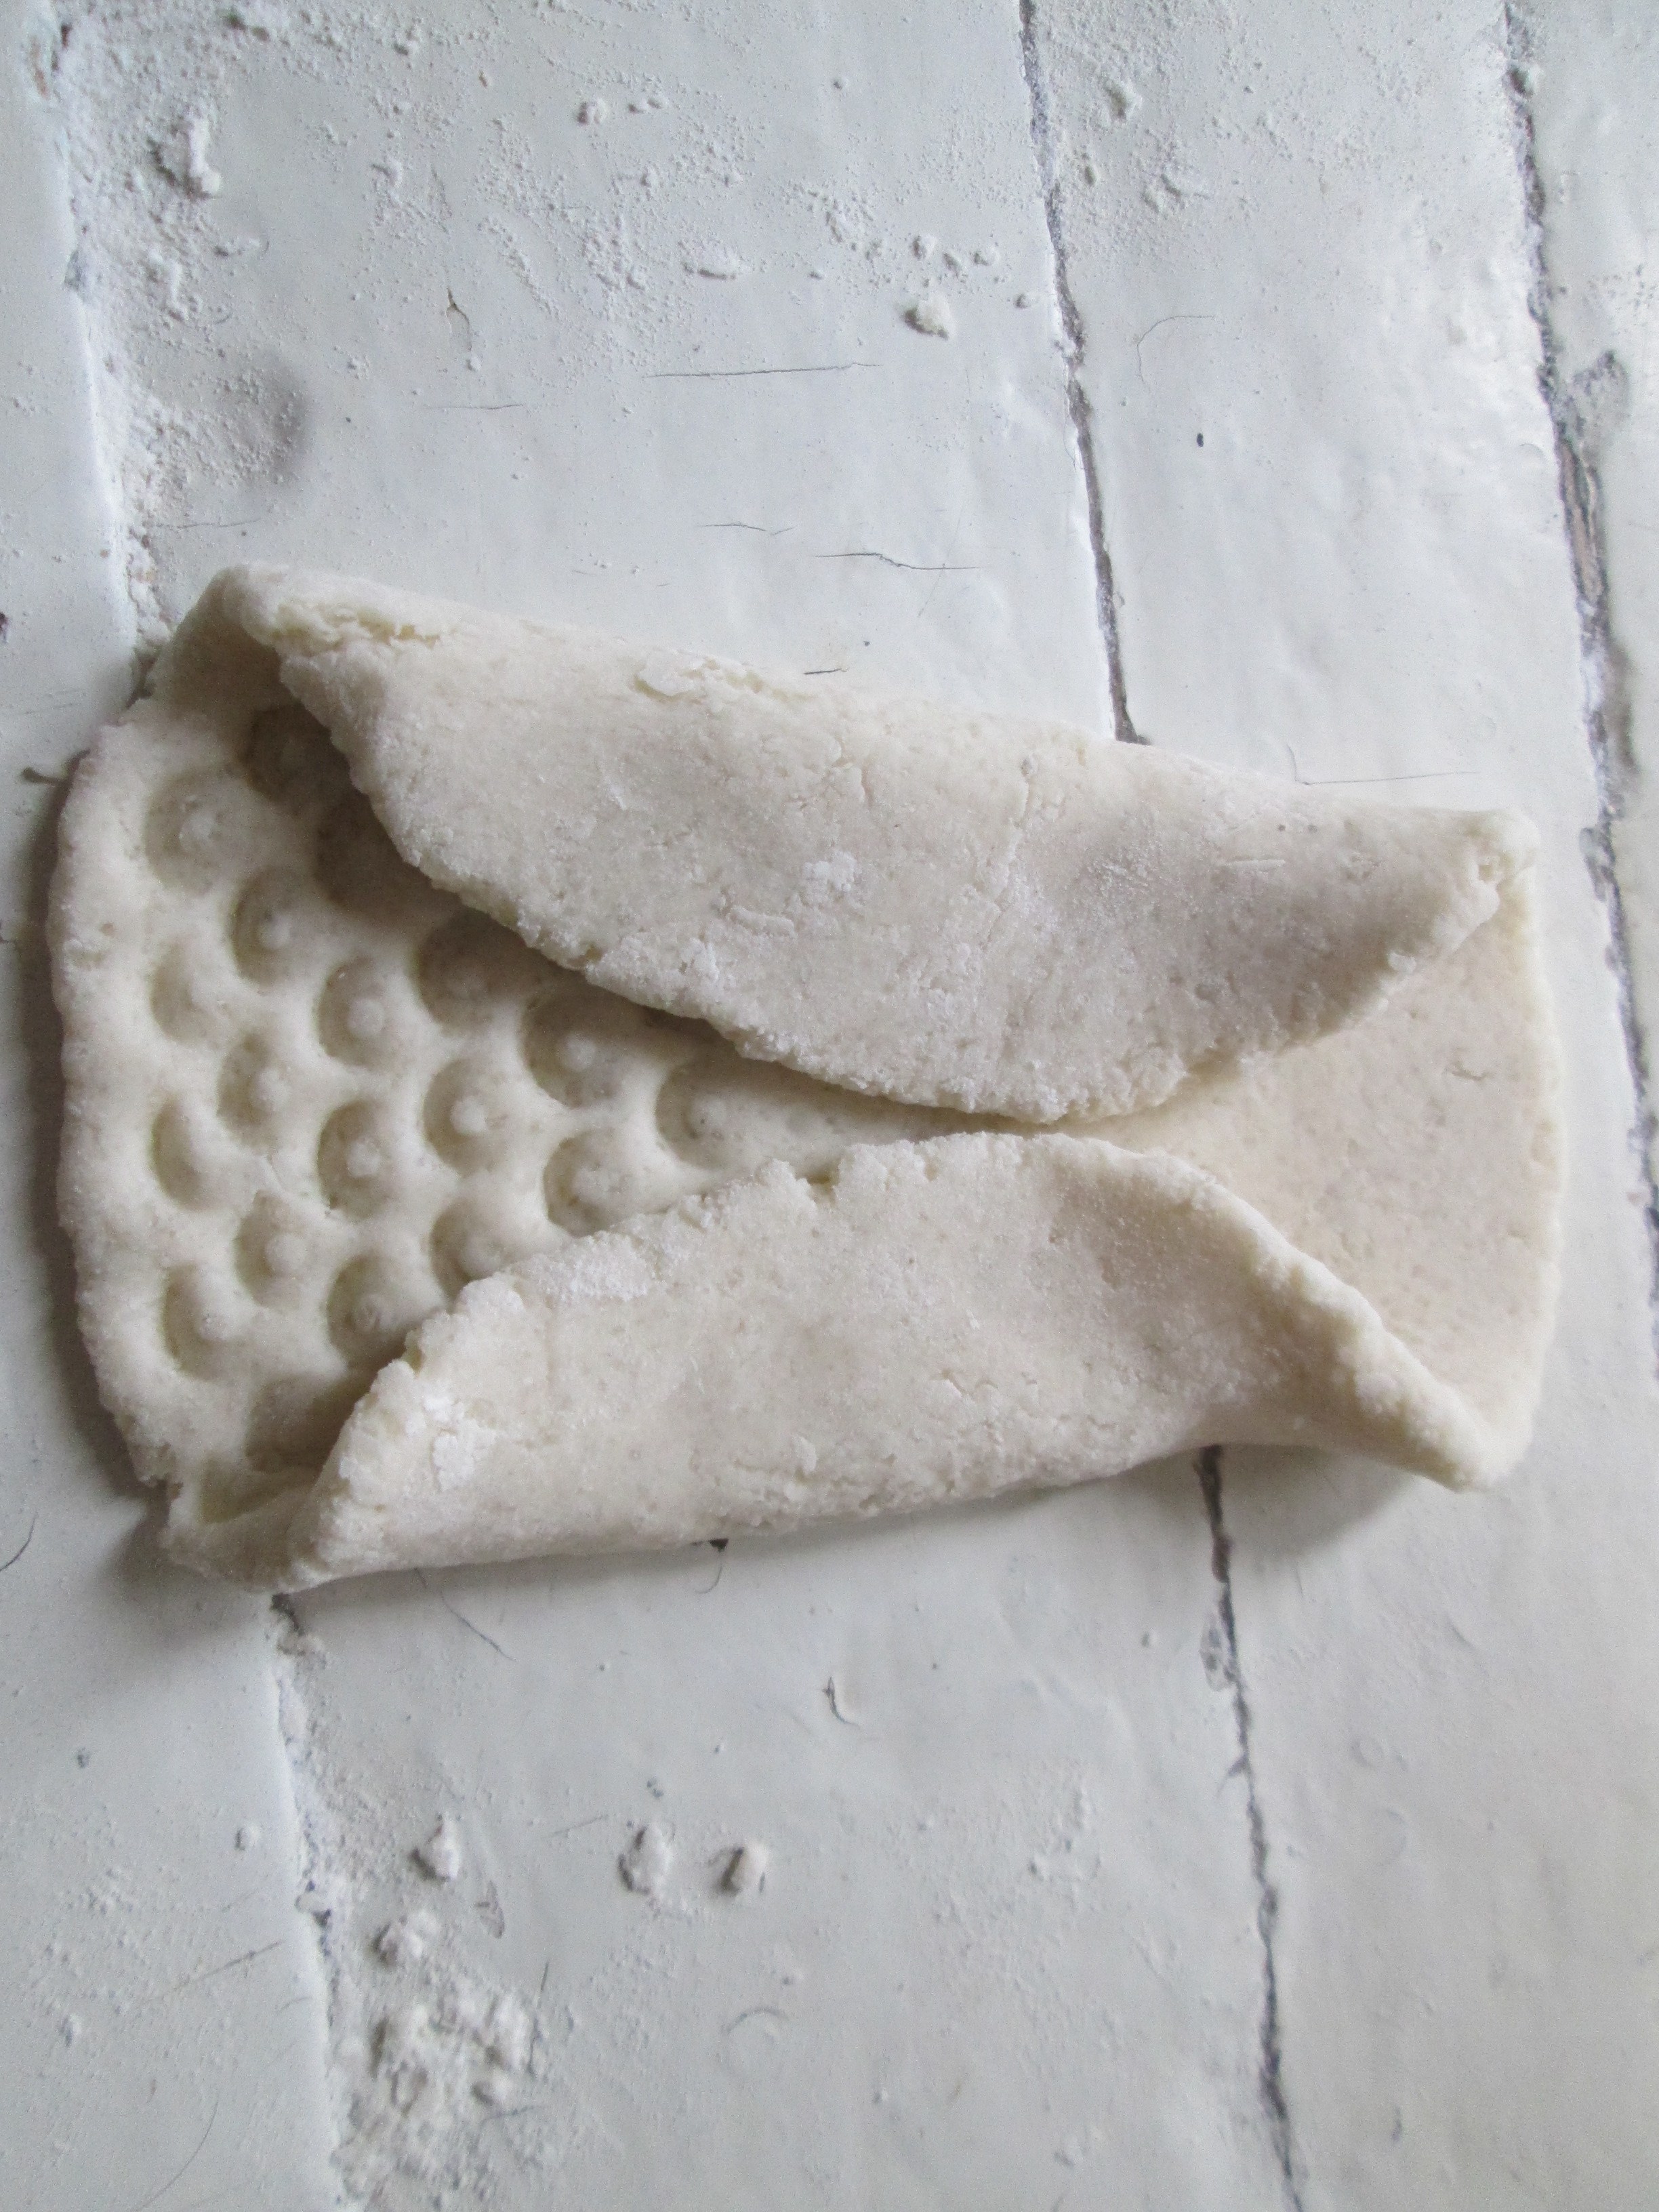
I fold the upper half of the base in half and bend it slightly on top.
On the top part I squeeze out round eyes with a cap and draw a beak.
I round the corners at the bottom. I make the “ears” sharper.

I set it to bake, having previously greased the wings and ears with yolk.

This is the golden Owl after baking for 7 minutes at 180 degrees.

What other owls can you make?

Toy
I pierce the second round blank through the top with a cap. And below I make prints with the same cap.
I set the toy to bake.

After baking, I apply a little red varnish to all the circles, and draw leaves above them. This is mistletoe. All that remains is to thread the ribbon into the hole and you can decorate the Christmas tree with the toy.

Hedgehog
A small barrel-cylinder is rolled up, in which the nose of the future hedgehog is slightly extended.

“Needles” are cut throughout the body. To do this you will need nail scissors with curved edges.
First, the edges of the scissors are slightly pressed into the dough, then the “needle” is cut.

A Christmas tree is made from salt dough using the same principle: its branches are cut with scissors.
Now go over the face and along each edge of the needle with a brush with yolk, and the product can be sent to the oven.
After baking, make a nose and eyes by pressing in a piece of a twig, and the Hedgehog with Golden Needles is ready!

This is how I managed to make 4 toys with my baby!

Vmdeo master classes
Very! I really want you to show off your work! Send the results of your work, share your successes, so that we can be happy for you! That's all for today! I remind you to subscribe and ask, don’t forget to bring your friends: it’s more fun together! All! Bye bye!
There is nothing cuter than New Year's crafts made with your child. Colored and shiny, a little uneven and this makes them even more touching and memorable.
Under New Year Every adult, not to mention children, awakens the desire to create cute little things that bring a feeling of comfort and warmth to the house... And although the stores are overflowing with factory-made toys and New Year's accessories, I want to make something of my own, unique, inimitable.
Elegant toys for the New Year's green beauty can be made from paper, fabric, and thread. Or you can use salt dough - another interesting and quite affordable material. How to do it for the New Year? This is what we will talk about now.
How to make salt dough?
First, you need to prepare the right salt dough. To do this, prepare one measure of fine salt and two measures of flour in advance. Dissolve the salt in warm or hot water, and when it cools, gradually add the salt solution to the flour, stirring constantly. You can add a little sunflower oil to the dough - it will make the mass more elastic and less sticky. However, it is more difficult to mold something from dough with added butter, since its pieces do not adhere well to each other. This option is good for simple single-layer crafts.
The dough should be quite stiff and hold its shape. Let it sit for the gluten to dissolve and get to work. Christmas tree decorations made from salt dough can be easily made using cookie cutters.
DIY New Year's crafts
Figurines made in this way are very reminiscent of traditional gingerbread and create a feeling of homeliness. You can make cute hearts, Christmas trees and stars: just roll out the dough into a thin (about 1 cm) sheet and invite your child to make figures out of it.

If you don’t have ready-made molds, you can cut them out of tin drink cans, bending them inside the edges so that the baby doesn’t get hurt. Even simple round pendants that can be made using a glass, small glass or small jar will look beautiful. Don't forget to make a hole for a loop in each figure.


Place the cut out figures on a mesh and let them dry thoroughly; If drying on a dense, flat surface, periodically turn the crafts over. You can use the oven, carefully drying the workpieces at low temperature.

We paint the dried figures with bright colors and cover them with sparkles.

The top of the crafts can be coated with transparent varnish - this will give them a beautiful gloss.

Thread a ribbon or thick thread - and the decoration is ready.

Christmas tree made of salt dough.

Salt dough heart.

You can paint Christmas tree decorations made from dough with paints.


The imprint of a child's hand makes a charming Santa Claus. The craft is done using the same technique. Let the craft dry well.

Apply a layer of white paint.

We paint the craft and cover it with varnish. Santa Claus is ready!

You can make wonderful things out of salt dough christmas decoration"pig with wings"

Do-it-yourself New Year's crafts from salt dough made in this way will become especially dear to children, and the children will be happy to join in the process of decorating the main symbol of the New Year.
DIY New Year's crafts from salt dough (video)
Christmas tree decorations made from salt dough (sweet and pink):


